North American - Rockwell OV-10A Bronco
(Hawk/Itareli/Testors 1/48)
By Akio Hasegawa, M.D.
[Preface] I am wondering if the Corps and Armed Forces (Joint Chiefs of Staff?) had not abandoned this gynre of COIN aircraft (counter-insurgency) in 1990s, some US soldiers would have survived in Afghan theatre under the cover of Forward Air Controller (FAC) mission, the debate may continue. High-tech "Shock and Awe" has not much meaning in the mountainous combat terrain. Bronco's endurance (ability to stay in the air): 7 hours 40 minutes!
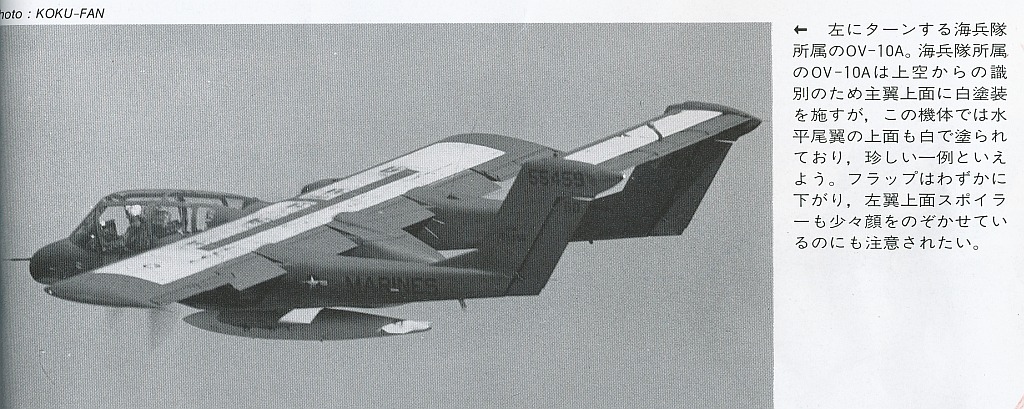
This is the target for my model, Marine Bronco 55459 (Crick to enlarge) in action near Da-nang Base in Viet Nam, probably with VMO-6 (Marine Observation Squadron - 6) in 1968-?.
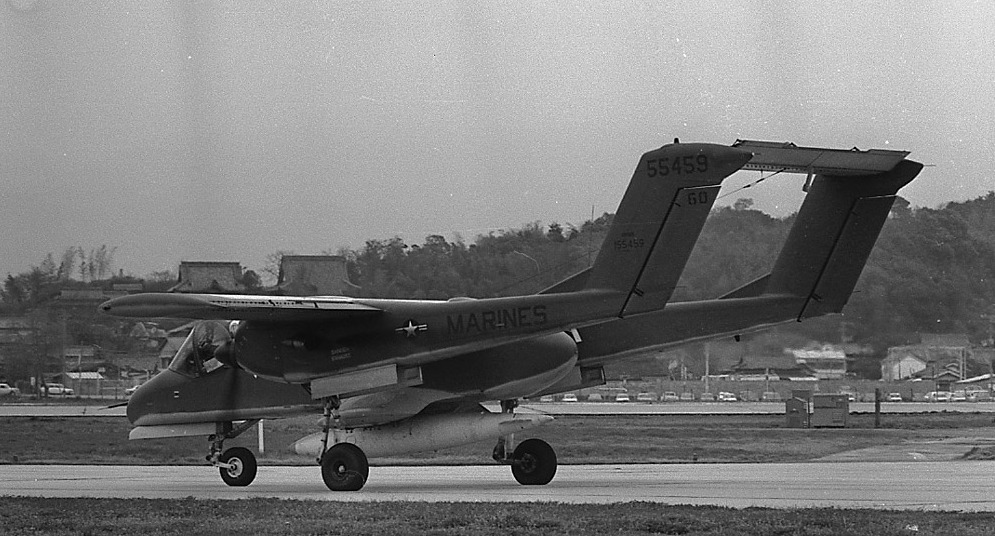
Ditto, Marine 55459 WB-60 with VMO-6, shot by anonymous shooter, on April 19 1970 at Itazuke Air Base in Kushu in Japan (Crick to enlarge).

Ditto, Marine 55459 WB-60 with VMO-6, shot by anonymous shooter, on December 21 1970 at Atsugi Naval Air Facility in Kanagawa Prefecture in Japan (Crick to enlarge).
(To view the images in each page, click the underlined phrases,
and to return to this page,
click RETURN key on the toolbar of your browser

(Crick for English description)
This site is licensed under a Creative Commons License.
(Crick for Japanese description)
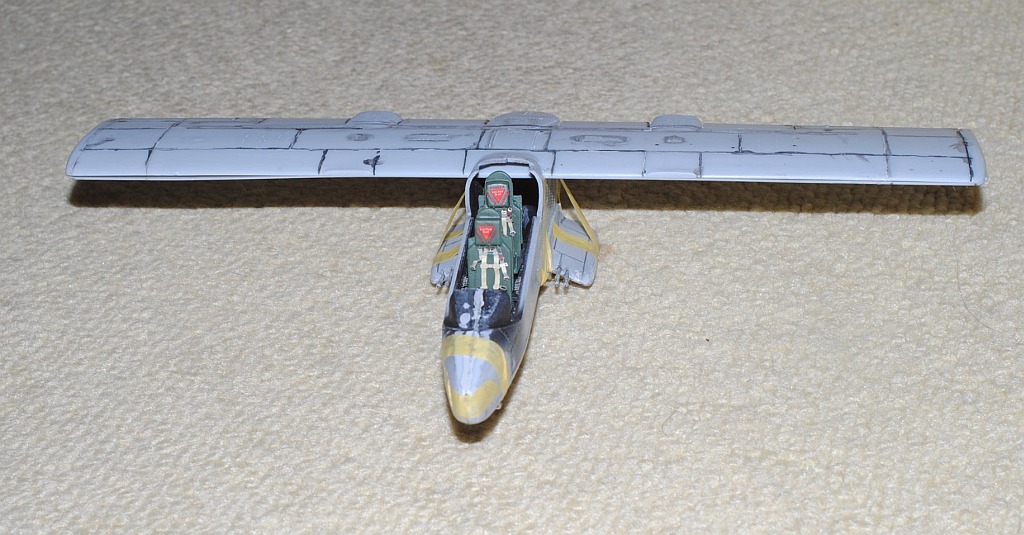
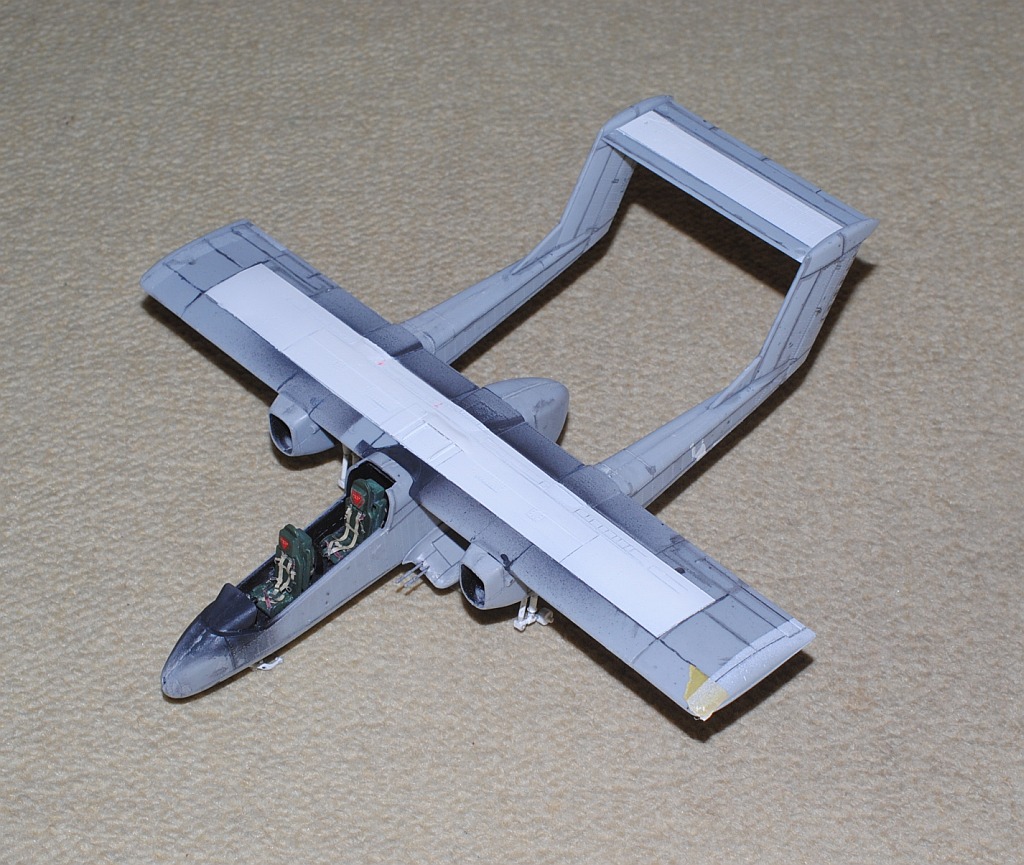
Completed Images (with crew figures)
* Using "Hasegawa US Pilot/Ground Crew Set: B (X48-5)" (Disclaimer: I have no genetic and financial relationship to this same-name company)
Serial #55413 of VMO-2 (Crick to enlarge).
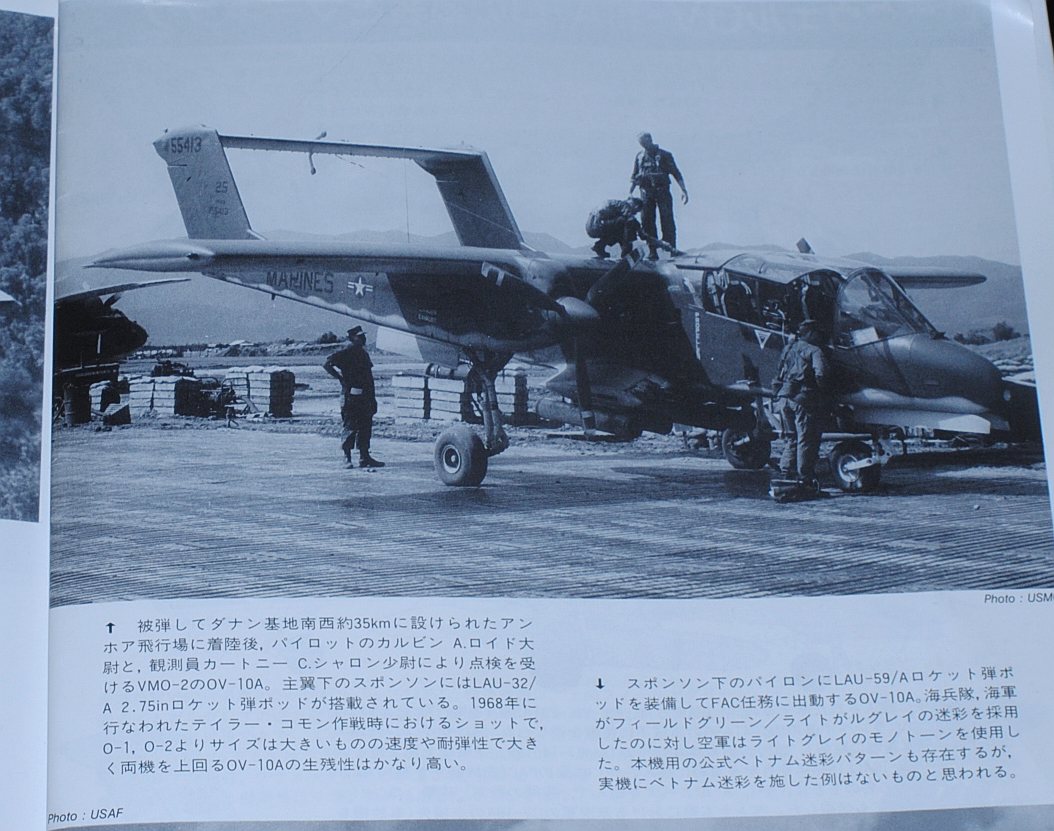
[Referenced Image] My model is from VMO-6, though, this image is very representative of their brave mission, I suppose. During Operation Talor Common in 1968, OV-10A of VMO-2 was hit and landed to An Hoa Airfield, circa 35 km southwest to Da Nang Base. The battle damage was assessed by pilot Major (or Captain) Calvin A. Lloyd (spell?) and observer Ensign Sharon C. Cartney (spell?). Under the sponson, LAU-32/A 2.75 inch rocket pods are installed. Very informative image from Famous Aircracts of the World, vol.45, OV-10 "Bronco", Kokufan, Bunrindo, Tokyo, Japan(2001/02, ISBN-13: 978-4893190420).
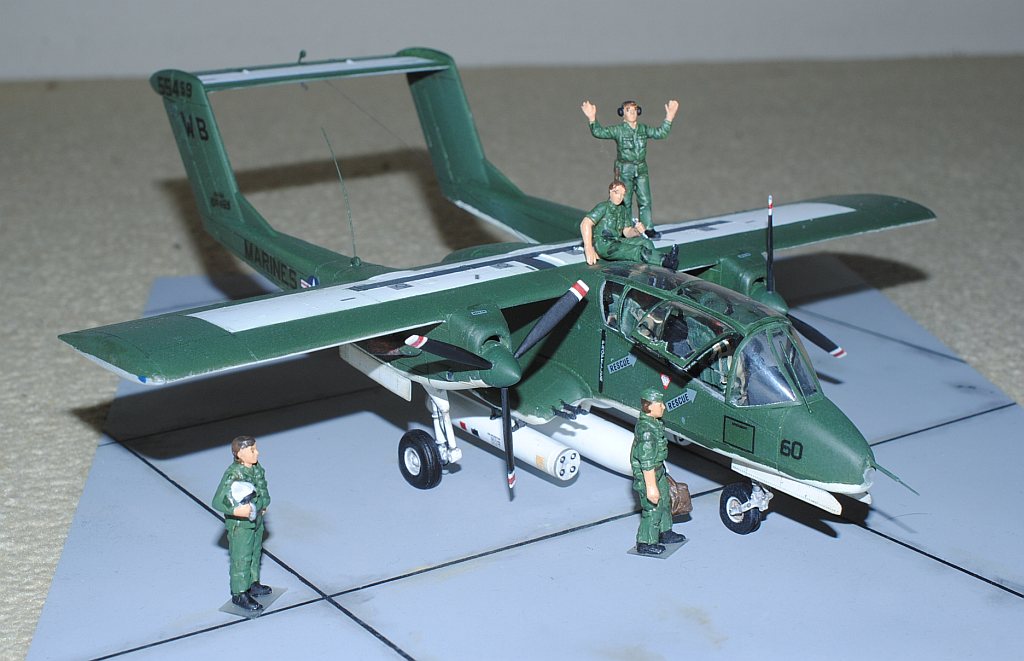
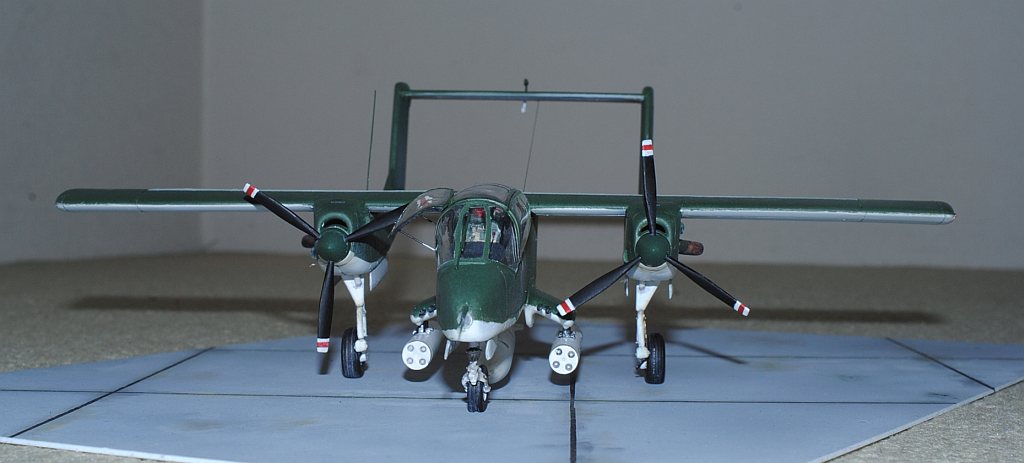
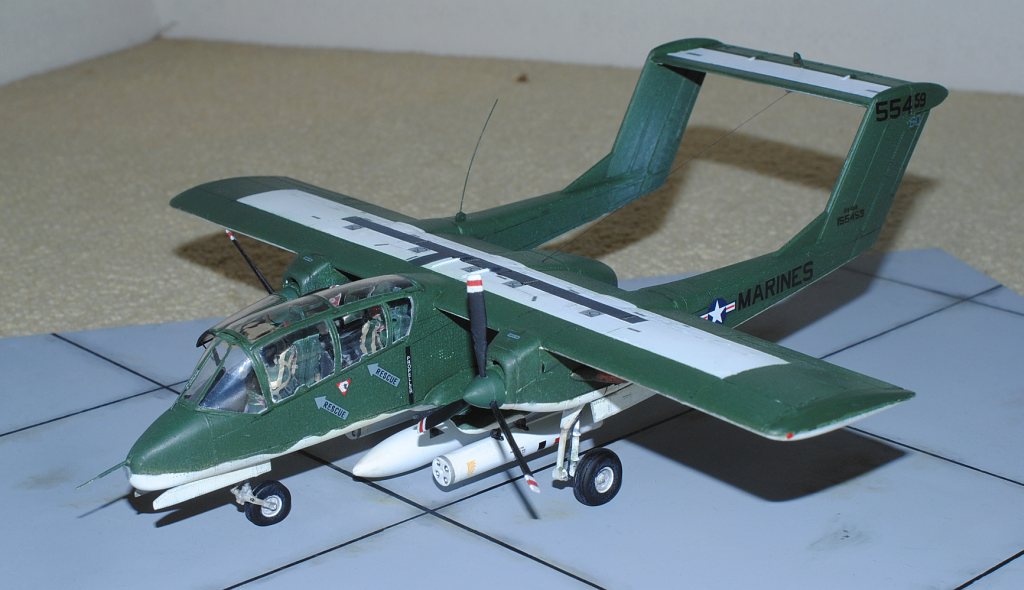
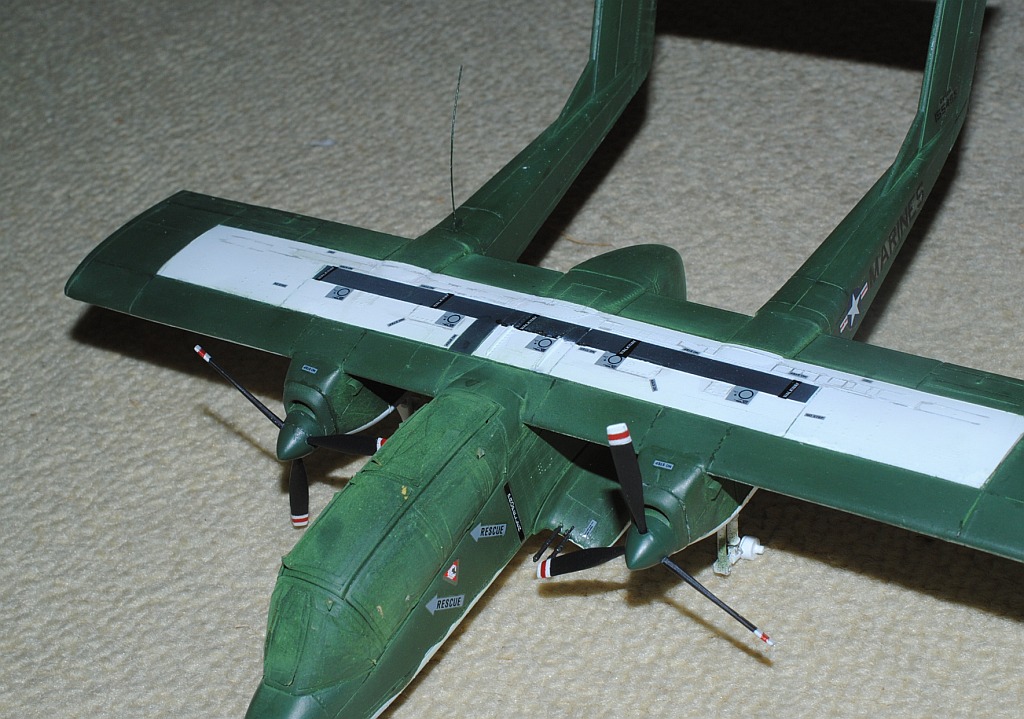
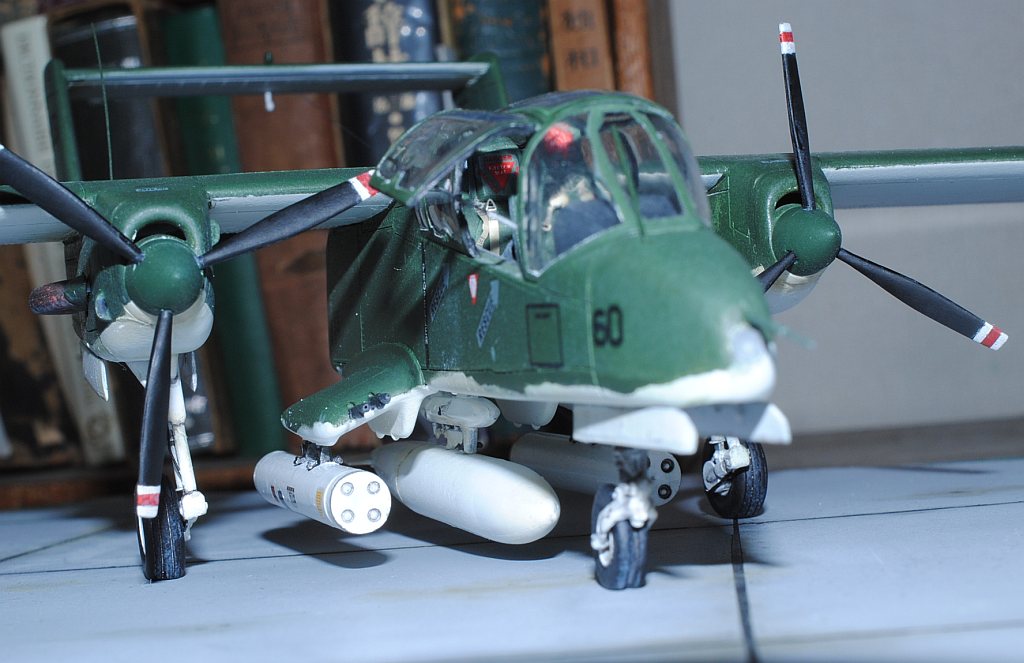
Serial #55459 of WB-60, VMO-6 (Crick to enlarge).

Serial #55459 of WB-60, VMO-6 (Crick to enlarge).
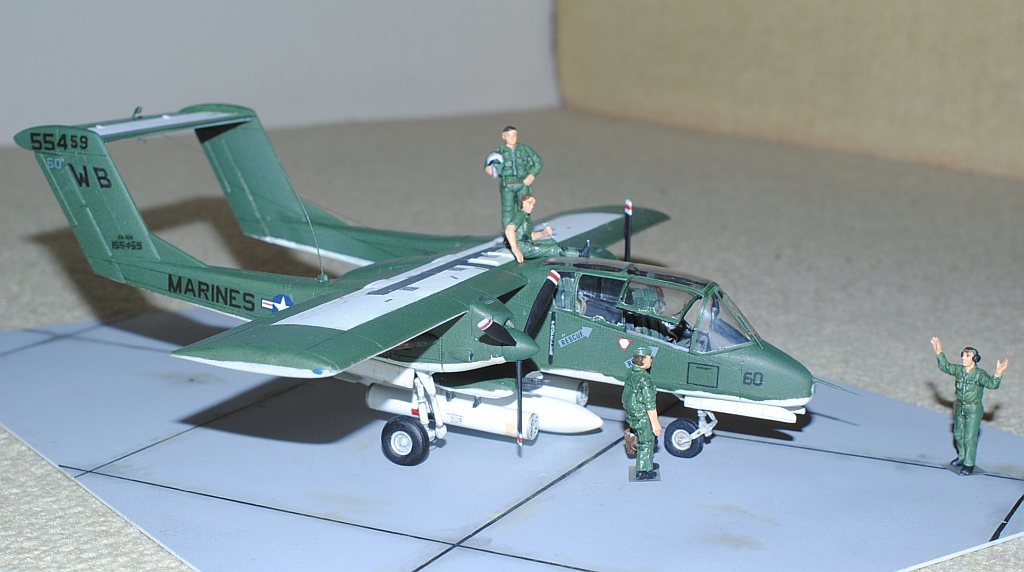
Serial #55459 of WB-60, VMO-6 (Crick to enlarge).
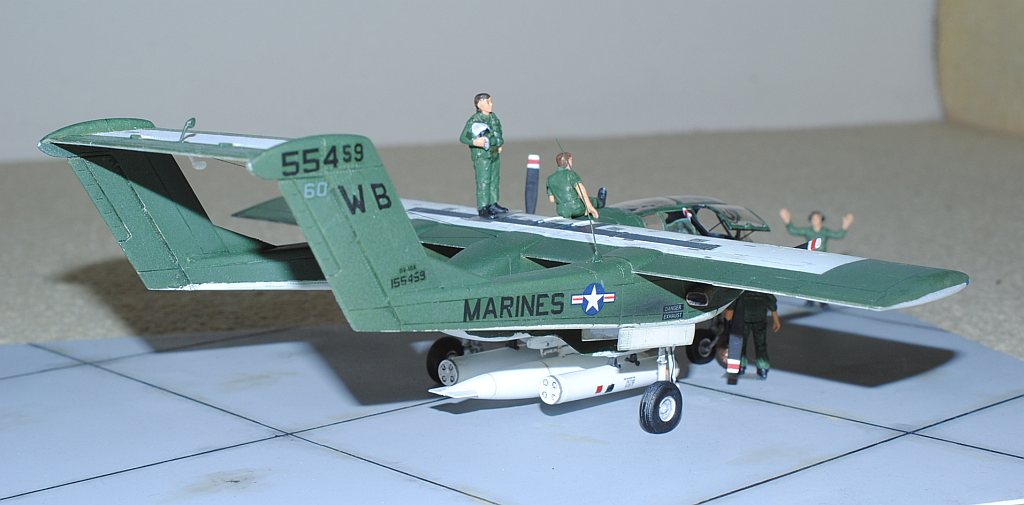
Serial #55459 of WB-60, VMO-6 (Crick to enlarge).
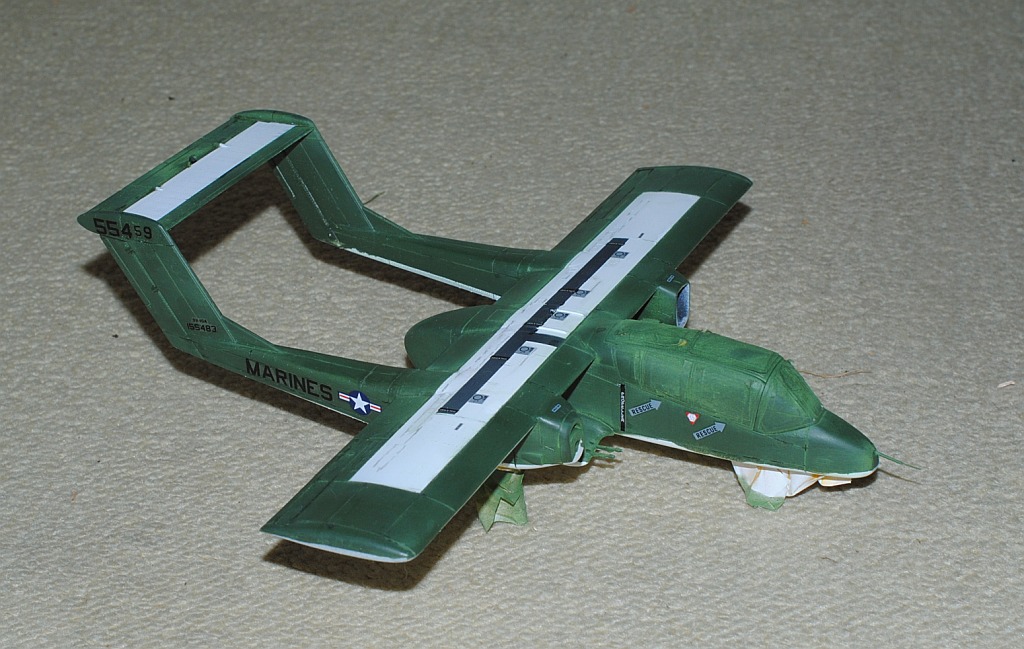
Completed Images (without crew figures)
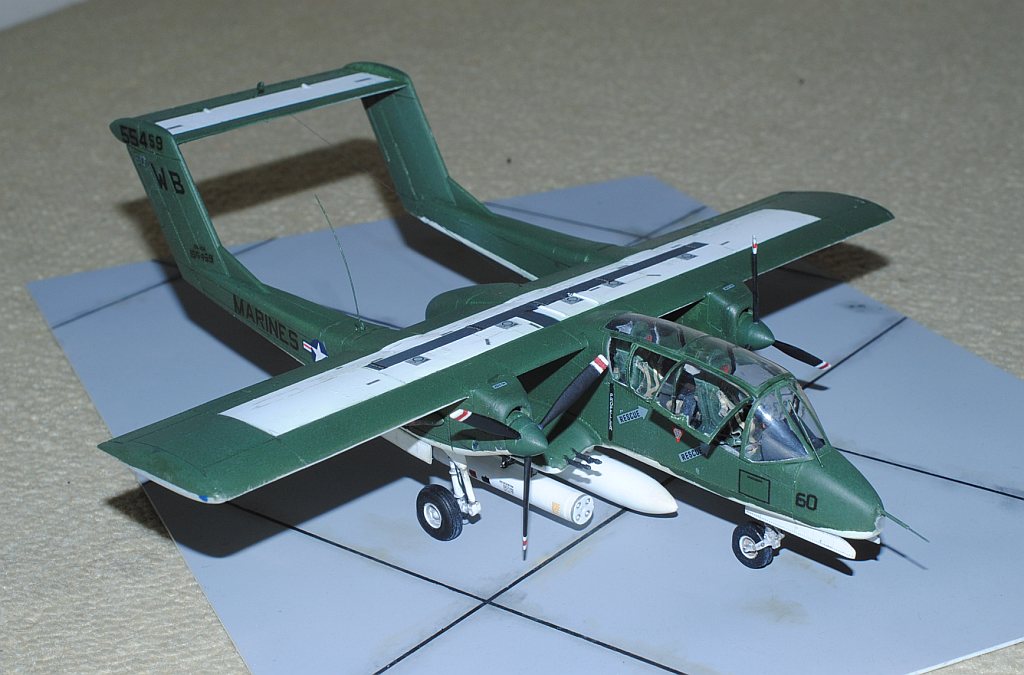
Serial #55459 of WB-60, VMO-6 (Crick to enlarge).
Serial #55459 of WB-60, VMO-6 (Crick to enlarge).
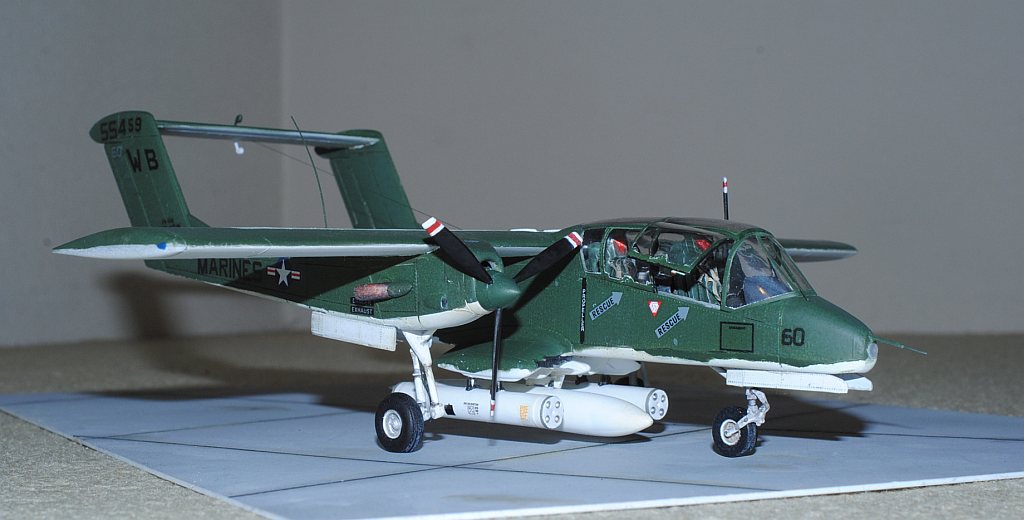
Serial #55459 of WB-60, VMO-6 (anterior view) (Crick to enlarge).
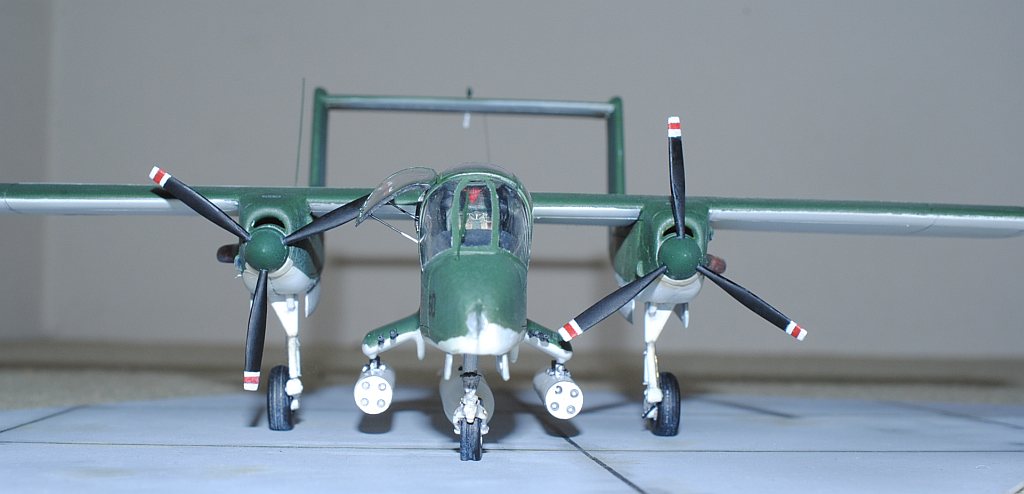
Serial #55459 of WB-60, VMO-6 (enlarged anterior view) (Crick to enlarge).
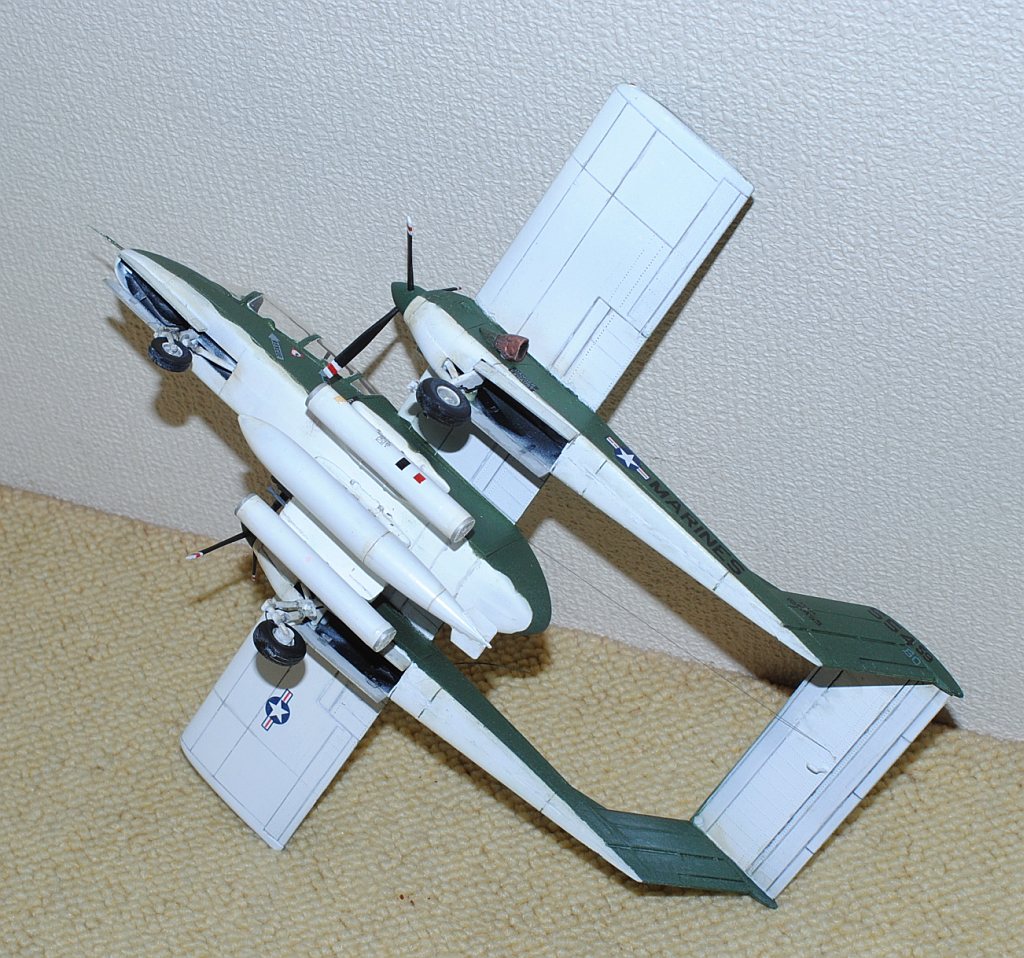
Serial #55459 of WB-60, VMO-6 (under surface) (Crick to enlarge).
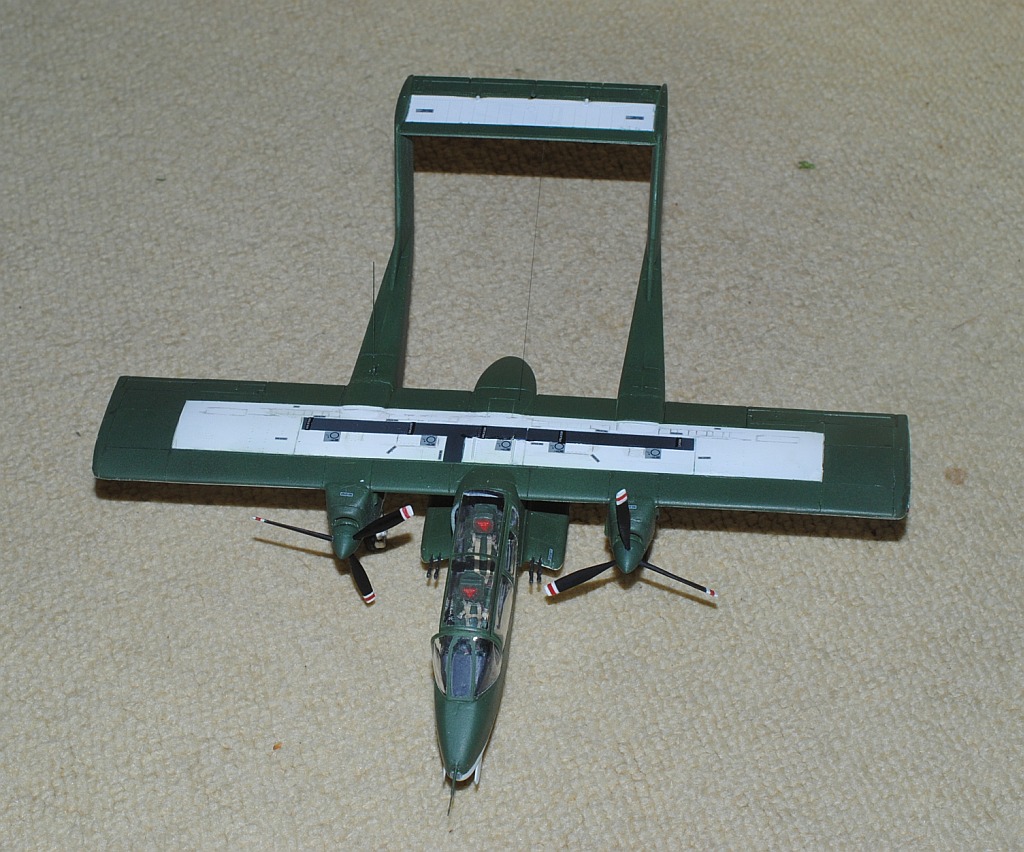
Serial #55459 of WB-60, VMO-6 (upper surface) (Crick to enlarge).
Serial #55459 of WB-60, VMO-6 (left anterior view) (Crick to enlarge).
Chronology
2013. 7.28. Next Project: OV-10A Bronco. I purchased this model from Amazon.com (Japan) at reasonable price (2,820 Yen). Actually I have been searching this kit for a while, however, up till the present the prices are not reasonable one, e.g., shipping charge at e-bay shops. This is only available 1/48 model, actually old one (original: Hawk USA, 1966?). No other option. Especially problematic is convexed panel partition lines, and reputedly disproportionally close distance between fuselage and two tail beams. And as the timing of modelling by Hawk was too fast, this is based on the first prototype intended for tri-service (actually Army retreated from this R and D later), as a result the main wing is before 3 m elongation for production type, they say.
2013. 9.1. I come across at ebay a brand new set of metal landing gear (white metal) for Testor OV-10 from Scale Aircraft Conversions at $17.09 (Seller: gamewise) with shipping $4.50, and I bought "it now",
2013. 9.6.-7. Exact three-view 1/48 drawing of OV-10A by Yachio Suzuki (Aireview July 1970, Japanese journal, Reference #1) was unearthed from the library at Hayama retreat. We are long-term regular subscriber to this journal, and have saved them. My late father Tatsuo was originally aircraft desiginer (engineer, planner) and I am airplane enthusiast (Actually, hoped to become that speciality before changing my mind to medicine.
Also excavated reference are two pamphlets from Aircraft of the World. the Complete Guide, International Masters Publishers, Inc., PA, USA (Reference #2), which was actually sent from my late uncle Kensuke Fukae (my late mother Miyoko's younger brother) in the USA as a gift to my late father Tatsuo (After Kensuke studied in the USA on Fulbright scholarship, got married there in New York with German American, got three kids, and moved up the ladder to the Vice President of Minolta USA. He passed away circa a decade ago).
These are really invaluable resource to the current project. I pile up main parts of Testor's Bronco model to this drawing, and evaluate the error, questioning if they are within acceptable range. BTW, this category of aircraft was called COIN aircraft (counter-insurgency) in those days (Vietnum war). The main wing: Wing span 0.3 cm short, and the distance between tail beams 0.6 cm short, compared with this drawing. On the other hand, according to the reference book, the wing span of the real thing 40 feet = 12.19 meter --1/48 --> 25.4 cm. This part measures 25.4 cm sharp. It seems no problem, contrary to the propagated too-short wing span accusation of this model. I will ignore, Photo-1 in piles,
Photo-2 heaved. Horizontal tailplane Photo-1 in piles, Photo-2 heaved. Fuselage, almost sharp, Photo-1 in piles, Photo-2 heaved. Twin tail boom, almost sharp, Photo-1 in piles, Photo-2 heaved.
Then, I dig parting lines on the surface, using sharp scratch gauge (width 0.2 mm, made from tungsten), followed by Tamiya panel line accent paint - temporary assembly.
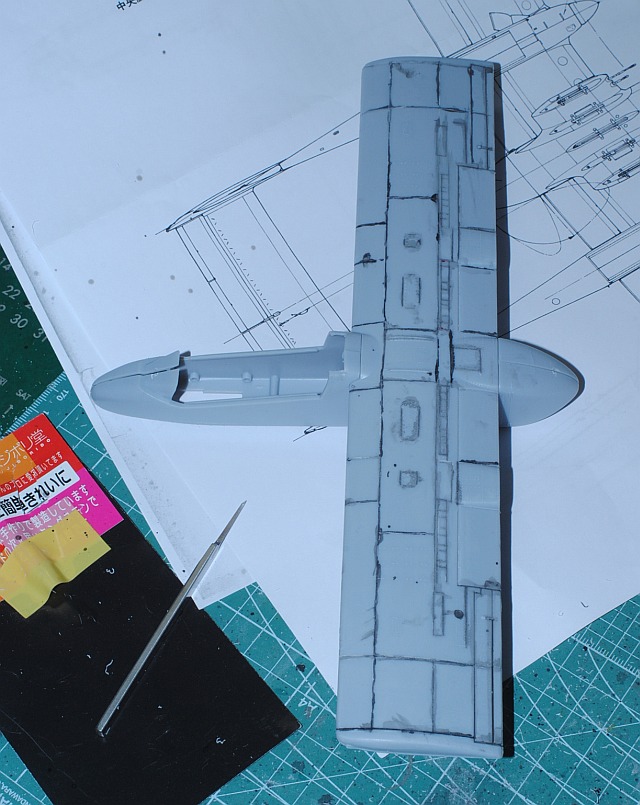
This week's accomplishment (Crick to enlarge).
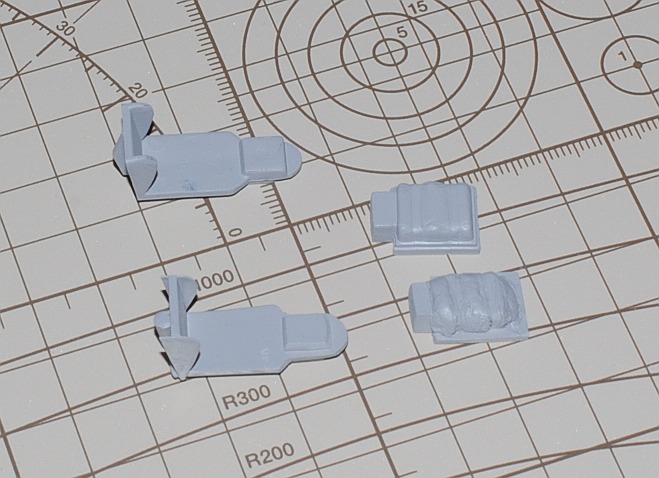
2013. 9.14-16. The interior of the cockpit of this kit is too simple and not supplied with details. Especially astonishing is no copilot seat is included! Actually both seats are ejection-type. So I make copilot seat from scratch, using 1.2 mm-thick and more thin plastic sheets. Photo-1: White seat in the right is newly built one, Photo-2: After applying putty to the back structure of the seat (lower right, parachute?), Tamiya surface primer (gray) is sprayed (lower two units are scratch-built),
This week's accomplishment (Crick to enlarge).
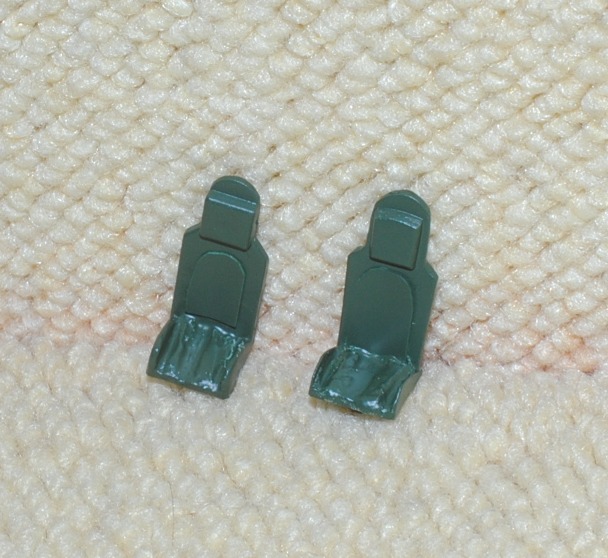
2013. 9.21-22. The seats are too simple and too minimalist with the original, so I add the unduration of the base with patty and dorsal plate with thin plastic plate Photo-1, then spray with deep green Photo-2,
This week's accomplishment (Crick to enlarge).
2013. 9.27-28. Firstly the intrumental panel for copilot is made with thin plastic plate, and painted in black, ditto viewed with two seats in position, ditto view from the back, temporarily assembled with fuselage, ditto temporarily assembled with fuselage.

This week's accomplishment (Crick to enlarge).
2013. 10.4-5. Cockpit interior is almost finished. Co-pilot seat is scratch built, control rod is made of soft solder wire, instrumental panel is cut and paste from several decal sheet from other kits, and seatbelts are by add-on eduard kit - Photo-1, Photo-2 Temporarilly installed to the fuselage, Photo-3 ditto, dorsal view, Photo-4 Side view, Photo-5 Seatbelts are diverted from eduard 49003 for Luftwaffe WWII bombers, Photo-6 Comparison with reference image, after fuselage glued.

This week's accomplishment (Crick to enlarge).
2013. 10.12-13. According to the image in the reference #3, the placement of each two 7.62mm machine-guns is asymmetric, left-sided two are inwardly (lower image), and right-sided two are outwardly set up (upper image).
Using syringe needle (21G) and 0.5mm metal line, I scratch built four guns (compare with meager original parts - lower), ditto. Now sponsons are placed to compare with the drawing in the reference #1.

This week's accomplishment (Crick to enlarge).
2013. 10.18-19. Sponsons are glued after embedding bumps with patty, sanding with retouching the 7.62mm machine guns - Photo-1,
Photo-2,
Photo-3,
Photo-4,
Photo-5,
This week's accomplishment (Crick to enlarge).
2013. 10.25-26. Upper surface of the main wing and tailplane of OV-10 was painted white in various patterns, in order to be identified Friend from the above-flying friendly planes during Viet Nam war. After masking and spraying white in rectangular pattern, temporary assembly is done using tapes -
Photo-1,
Photo-2.
This week's accomplishment (Crick to enlarge).
2013. 11.02. After polishing clear parts of the canopy with Tamiya compound (one of three rank, For Finish), clear portions are masked with tape and glued carefully, ditto, close-up view, then flat black for internal aspect of the window frames is sprayed. Later, on this black, deep green will be sprayed for external surface color.
This week's accomplishment (Crick to enlarge).
2013. 11.08-09. Pitot tube was made scratch using injection needle (21G) and 0.3mm brass line, Photo-1, Photo-2, then undersurface of the fuselage and wings is sprayed mat white (surface primer) in the box of Amazon, Photo-3.

This week's accomplishment (Crick to enlarge).
2013. 11.17. Fuselage, main wing and tail wing are glued - Photo-1.
2013. 11.23. In preparation for spraying green to the upper surface, masking is preformed with tapes and Blu-Tack - Photo-1 Upper surface, Photo-2 Lower surface,
2013. 11.30. Upper surface green (Tamiya XF-58 Olive Green) was sprayed over masking tapes. Before masking over the upper-surface IFF white is removed, MIG-production's pigments was, after very thinly diluted with water, sprayed.
Now, all the maskings excluding those of canopy are removed. Ditto, looking a bit too much battle-fatigued in Viet Nam. Later I will make some adjustment.

This week's accomplishment (Crick to enlarge).
2013. 12.07. I began to apply decals with use of Mark Fit solution. I divert American insignia (star with red side line) from 1/72 F-18A Hornet, since the attached original decals are for low-visibility one (monotone only-gray insignia) - Photo-1, Photo-2.
This week's accomplishment (Crick to enlarge).
2013. 12.14. Landing light (USAF 27TASS 68-3795 in 1989-1991 "Fast In - Last Out") is not included in the original kit , so I made with clear plastic branch. Maybe too much protuberant, I will adjust it later - Photo-1. Mass balance weights on the elevator are scratch-built de novo with aluminium wire and putty, since the original parts is too fat and dull - Photo-2. Tip of propeller blades are painted white-red-white stripe in the Marine version , while yellow(external)-white(inner) in the USAF version. I am making Marine version (actually, this is the target for my model, Marine Bronco 55459 in action near Da-nang Base in Viet Nam, probably VMO-2 in 1968-). Firstly I painted red, Photo-3, then painted white stripe, Photo-4. After the tip stripe portion is masked, main portion is painted black - Photo-5.

This week's accomplishment (Crick to enlarge).
2013. 12.22. After painting of the propeller blades with white-red-white stripe on the tip is a few more times corrected, blades are glued to the spinner - Photo-1. Antenna is de novo scratch-built with 0.3 cm brass line and plastic (AN/ARC-54 VHF-FM; This is the image before being finely faired). Propellers glued to the unique twin booms - Photo-2,
Photo-3 - Special attention must be paid to their contrarotation (rotational direction: Left propeller seen from the front rotates clock-wise, and right counter-clock-wise).
This week's accomplishment (Crick to enlarge).
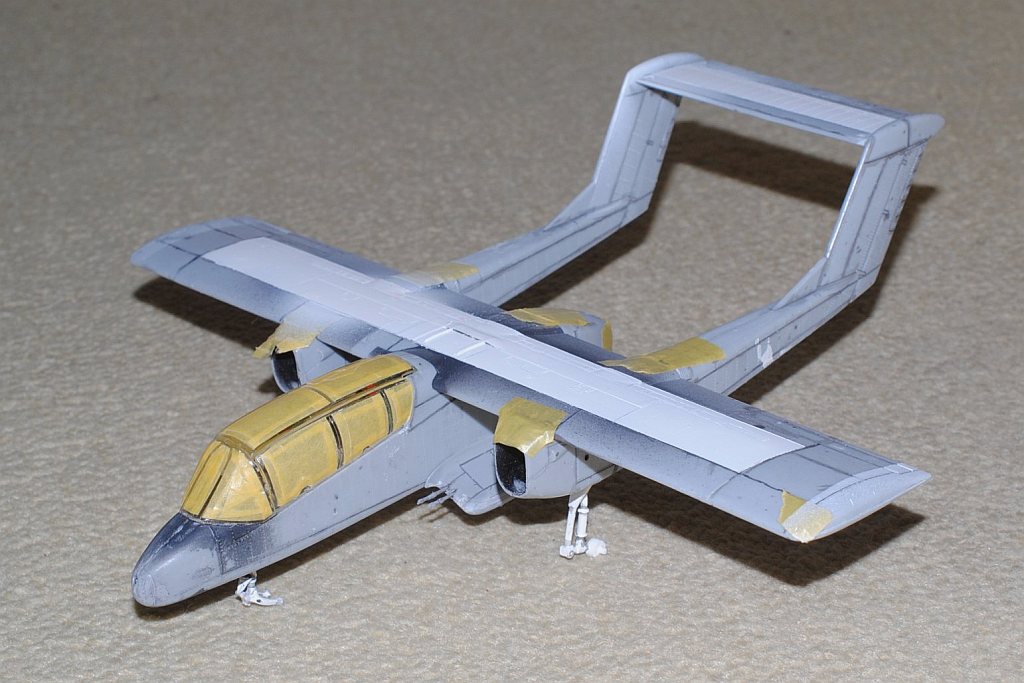
2014.01.02-04. Since nose and mainwheel doors are outrageously thick, I thin them down with sandpaper #180. After gluing them to the fuselage, I spray the whole model with My Hobby's clear matt Topcoat. Then in some trepidation I peel off the masking tapes from the canopy - Photo-1. Small white spots are scattered on the black propeller blades due to matte clear spray, and glasses of the canopy are not clear. Some fixes are made (additional painting of the propeller blades with matt black and cleaning of residual compound on the glass of canopy after polished with Tamiya ultra-fine compound) - Photo-2. BTW, thin antenna line from posterior fuselage to horizontal tail wing (AN/ARC-120 HF-SSB) is from my wife's ruptured stocking, which is elastic and very thin, recommended to the modellers. But think twice if you request not-yet-married partner (old wife is no problem!). Burnt texture of the exhaust is not badly expressed with painting, I think. The canopy glass is additionally enough polished with Tamiya ultra-fine compound - Photo-3, Photo-4.
This week's accomplishment (Crick to enlarge).
2014.01.11-12. Side glass of the canopy is cut to anterior and posterior halves, and wiper on the front screen is assembled with 0.3mm brass line and instant adhesive -Photo-1. Side glass is glued with stay rod (actuator?) made from 0.3mm brass line as well - Photo-2, Photo-3 Anterior view, Photo-4 Ventral view. For the current modelling this photo is very informative - Photo-5.

This week's accomplishment (Crick to enlarge).
2014.01.17-18. 150-gallon drop-tank (type Aero 1C) is scratch-built using excess parts (anterior and posterior half, and tail fin separately), and rocket pods (launcher, LAU-32/A 2.75 inch rocket pods) are transfered from Fujimi 1/48 F-4 Skyhawk, which I modelled circa 40 years ago. Ventral pylon for tank is from Tamiya 1/48 ammunition package for US jets - Photo-1, Photo-2, Photo-3, Photo-4, Photo-5 (under surface), Photo-6 (left anterior angle), Photo-7 (enlarged view of ammunition and drop-tank).
This week's accomplishment (Crick to enlarge).
2014.01.24-25. The figures of the crew and ground-based personnel are painted, using Hasegawa's 1/48 U.S. Pilots/ Ground Crew Set:B, with reference to the image from the reference No. 3 (see bellow) - Serial #55413 of VMO-2. My model is from VMO-6, though, this image is very representative of their brave mission, I suppose. During Operation Talor Common in 1968, OV-10A of VMO-2 was hit and landed to An Hoa Airfield, circa 35 km southwest to Da Nang Base. The battle damage was assessed by pilot Major (or Captain) Calvin A. Lloyd (spell?) and observer Ensign Sharon C. Cartney (spell?). Under the sponson, LAU-32/A 2.75 inch rocket pods are installed. Very informative image for the current project. The diorama is completed - Serial #55459 of WB-60, VMO-6, Photo-1 (right anterior view), Photo-2 (Upper right anterior view),
Photo-3 (right-side view),
Photo-4 (right posterior view).
This week's accomplishment (Crick to enlarge).
References:
1. Drawings of OV-10A 1/48 by Yukio Suzuki, Aireview (Japanese monthly journal), July 1970.
2. Rockwell OV-10 Bronco, Group 5 Number 28, and Rockwell OV-10A Bronco, Group 4 Number 105, in Aircraft of the World. the Complete Guide (leaflets for filing), International Masters Publishers, Inc., PA, USA
3. OV-10 "Bronco" Famous Aircraft of the World No.45 (in Japanese). Bunrindo, Japan (2001/02, ISBN-13: 978-4893190420).
Back to "Scale Model Hobby" Index Page
DISCLAIMER: The views expressed here are those of the author Akio Hasegawa and do not reflect the official policy of any institutions in Japan. I have no finantial interests regarding this project. Citations of trade names do not constitute an endorsement of the products. Feedback is, as always, encouraged.
Please send your comments to akio-h@fg-khn.jp
Back to previous Home Page at AOL (Till October 31 2008)
Back to previous Home Page at geocities.jp web host (Till March 31 2019)
Back to New Home Page (Translocated Sakura server)
Version 1.00. 2024.08.01.